Categories
Wordpress Plugins Digital Marketing Agency E-commerce

Boost Sales by 45% with NitroPack: Transform Your Website Performance Instantly

In the fast-paced digital age, website speed is crucial. A slow website not only frustrates visitors but also impacts sales and SEO rankings. As a digital marketing company, Spanrig, we’ve experienced firsthand the transformative power of optimizing website performance. One tool that has consistently delivered remarkable results is NitroPack. In this blog post, we’ll share our journey of overcoming slow website issues and how NitroPack helped us skyrocket our sales. We’ll also highlight the unique features of NitroPack and why it’s the best choice for anyone looking to enhance their website performance and especially e-commerce performance.

Our Challenge with Slow Websites

A few years ago, we noticed a disturbing trend: our beautifully designed e-commerce websites were generating less sales than expected. After conducting extensive analysis, we pinpointed the culprit – slow website speed. Customers were abandoning their carts and leaving the site due to sluggish load times. The impact was severe; our conversion rates were plummeting, and customer satisfaction was at an all-time low.

Discovering NitroPack

Determined to find a solution, we explored various website speed optimization tools. Traditional caching plugins provided some improvement but were not enough to meet our performance goals. Then, we discovered NitroPack – a comprehensive speed optimization SaaS solution that promised to revolutionize our website performance.

Implementing NitroPack

The integration was extremely easy. Unlike other WordPress plugins that required multiple configurations and sometimes add-ons like Image Optimizer etc., this plugin offered all performance optimization features in one place. Here’s what NitroPack brought to the table:

  • Caching: Smart cache invalidation, automatic cache warmup, and device-aware caching.
  • Code Optimization: Minification and compression of HTML, CSS, and JS files, along with critical CSS generation.
  • CDN Integration: Built-in Cloudflare CDN for faster content delivery.
  • Font Optimization: Compression, subsetting, and optimized loading strategies.
  • Image Optimization: WebP conversion, advanced lazy loading, and adaptive image sizing.

Results: A Dramatic Transformation

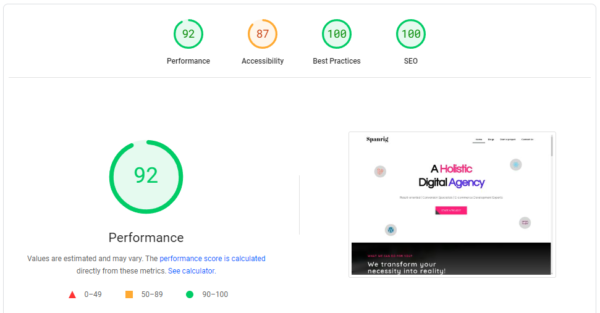
The results were nothing short of extraordinary. After implementing NitroPack, our website speed scores on Google PageSpeed Insights scored above 90, and our pages started loading within 3 seconds. Here’s a snapshot of the improvements we observed:

  • Improved Load Times: Our website load times decreased by 60%.
  • Higher Conversion Rates: Conversion rates increased by 45%.
  • Enhanced User Experience: Customers enjoyed smoother and faster journeys, leading to increased satisfaction and repeat visits.
  • Boosted SEO Rankings: Our improved site speed positively impacted our SEO rankings, leading to higher organic traffic.

Screenshot of Spanrig website's Google PageSpeed Insights score above 90

Why NitroPack Stands Out?

NitroPack is not just another speed optimization plugin. It’s a comprehensive service that goes beyond traditional caching. Here’s why it is the best choice for your website:

  1. All-in-One Solution: This amazing service combines caching, code optimization, CDN, font optimization, and image optimization into one powerful tool.
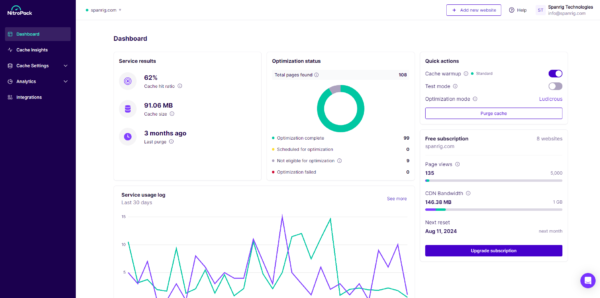
  2. User-Friendly Interface: The dashboard is intuitive and easy to navigate, even for those without technical expertise.
  3. Seamless Integration: Works effortlessly with WordPress and other platforms, ensuring minimal disruption during setup.
  4. Continuous Optimization: NitroPack offers no-touch updates, new feature development, and 24/7 customer support to keep your website at peak performance.
  5. Proven Results: Over 200,000 active users and top scores on Core Web Vitals and Lighthouse Performance attest to its effectiveness.

Screenshot of NitroPack's user-friendly dashboard

Key Features of NitroPack

  • Smart Caching: Advanced caching techniques that ensure your site is always fast.
  • Code Minification: Reduce file sizes for quicker load times without compromising functionality.
  • Built-in CDN: Leverage Cloudflare’s CDN for faster content delivery globally.
  • Font and Image Optimization: Ensure fonts and images are optimized for speed and quality.

Some words from our Customers

Our experience with NitroPack has been overwhelmingly positive, but don’t just take our word for it. Here are some testimonials from other satisfied users:

Spanrig transformed our site speed overnight. Our customers are happier, and our sales have never been better

– Yatin (E-commerce Store Owner)


Initially i asked Vinay, How to increase sales? He came up with root cause analysis and took permissiont to implement some changes in the website. I gave a go ahead as i trust them. These people have not only made our website feel butter smooth but increased our sales by whooping 200%. – Lukesh (E-commerce Store Owner)

Conclusion

NitroPack has been a game-changer for our digital marketing company. By optimizing our website speed, we’ve seen a significant increase in sales and customer satisfaction. If you’re struggling with slow website performance, it’s time to consider NitroPack. Not only will it enhance your site’s speed, but it will also provide a comprehensive solution for all your optimization needs.

Explore Nitropack here

Categories
Wordpress Plugins

[SUCCESS] Eliminate Elementor Image Optimizer Hints in 10 Minutes with This Powerful CSS Solution

Are you tired of being bombarded with hint messages from the Elementor Image Optimizer plugin while trying to focus on your WordPress website design? If so, you’re not alone. Many users have expressed frustration with these intrusive notifications that disrupt their workflow.

Check out the frustrated community posts here:
1. https://www.facebook.com/groups/Elementors/permalink/7054910934634632/

2. https://www.facebook.com/groups/Elementors/permalink/6858673407591720/

3. https://www.facebook.com/groups/Elementors/permalink/6920106524781741/

4. https://www.facebook.com/groups/Elementors/permalink/6942009809258079/

5. https://www.facebook.com/groups/Elementors/permalink/6834807553311639/


And here’s their response: https://www.facebook.com/groups/Elementors/permalink/7099720480153677/

However, there’s good news – you can easily eliminate these hints using a simple solution.

The CSS solution to Elementor Image Optimizer Hints:

function spanrig_remove_elementor_image_optimiser_hint() { ?>
<style>
.elementor-control-notice:has(> button.tooltip-target[data-event="image_optimizer_hint"]),
.elementor-control-notice:has(> button.tooltip-target[data-event="image-optimization-once"]),
.elementor-control-notice:has(> button.tooltip-target[data-event="image-optimization"]),
.elementor-control-notice:has(> button.tooltip-target[data-event="image-optimization-once-media-modal"]),
.elementor-control-notice:has(> button.tooltip-target[data-event="image-optimization-media-modal"]) { 
    display: none !important;
}
</style>

<?php }
add_action( 'elementor/editor/before_enqueue_styles', 'spanrig_remove_elementor_image_optimiser_hint' );

This CSS code specifically targets elements related to the Elementor Image Optimizer hints and hides them from view, allowing you to focus on your design tasks without interruption.

Implementing the Solution:

Now that you have the CSS solution at your disposal, let’s walk through the steps to implement it on your WordPress website:

  1. Access Your WordPress Dashboard: Log in to your WordPress dashboard using your credentials.
  2. Navigate to Themes: Once logged in, hover on “Appearance” in the left-hand menu and click on “Theme File Editor”
  3. Access Child Theme: Within the Theme File Editor, locate the “Functions.php” file. This is where you can add the above custom code.
  4. Add the custom Code: Copy the custom code provided above and paste it into the “Functions.php” file. Ensure that you paste it at the bottom.
  5. Save Changes: After adding the custom code, click on the “Update File” button to save your changes and apply the CSS to your beloved editor.
  6. Refresh Your Editor: Once saved, refresh your editor to see the changes take effect. The Elementor Image Optimizer hints should now be eliminated from your interface, allowing you to work without distractions.

Note: This method is not the best but solves the purpose until Elementor releases an ON/OFF toggle for such hints.

Conclusion:

With this simple CSS solution, you can take control of your Elementor editing experience and eliminate the distractions caused by Image Optimizer hints. Say goodbye to interruptions and hello to a smoother, more efficient workflow. Empower yourself to focus on what truly matters – creating stunning websites with Elementor.

Categories
Wordpress Plugins Tools

Best Amazing Features and Tips of Microsoft Clarity

Microsoft Clarity is an essential product for a lot of reasons. However, for most businesses, it boils down to one question: how can I get the most out of it? For this reason, we have put together some basic instructions and tips to use the tool and get the best value out of it.

What is Microsoft Clarity?

Microsoft Clarity is an analytics tool that allows you to understand how users interact with your website. It is a way to get more insight into what your customers are thinking, doing, and feeling on your website.

You can use it to see how many people visit your website, what they do when they’re there and why they leave. You can also use it to see if people find the content they’re looking for or if they’re getting confused by anything on the site.

You can also use Microsoft Clarity to see which pages are getting the most traffic and where traffic is coming from. It will help you prioritize what’s working and what isn’t. You can also see how long users are spending time on your site and where they’re clicking. You can ensure they are finding what they need efficiently.

Microsoft Clarity’s rich features and tips for leveraging them

Here are the various striking aspects of Microsoft Clarity and how you can leverage them for the best results for your business.

  • Advanced user insights

Microsoft Clarity’s dashboard displays several advanced insights that help you understand your users better. These include session metrics, traffic sources, and charts. The data helps you know how users are interacting with your site and what they do when they get frustrated.

The most essential type of insight is the session metric. Session metrics tell you how long users spend on your site and the number of sessions per day. You can use this information to determine if your site is too slow or if other issues are causing users to leave quickly.

Another type of insight is the traffic source. This tells you where people are coming from when they visit your site. It is critical to know what areas of your website your visitors frequent so that you can better target them with ads or content that appeals to their interests.

  • Nuanced filters and custom tags

Microsoft Clarity offers advanced filters that allow you to search through fine-tuned criteria like the cursor movements of a mouse. You also get the option of custom tags that help you in several ways. You can use custom tags to:

  • Get user-specific heatmaps and session recordings.
  • Get conversion information related to purchases or form submissions.
  • Track user activity, including the pages they view.
  • Frustration metrics

Frustration can occur when users struggle to complete a task, accomplish a goal, or remain confused about how your website works. When you do not address this issue in time, it will lead to several people abandoning your website. Microsoft Clarity helps you identify frustration metrics like:

  • Rage clicks
  • Dead clicks
  • Excessive scrolling
  • Quick backs
  • Session heatmaps

The heatmap feature of Microsoft Clarity allows you to understand how your users interact with your website. It offers a visually rich layout, including warm colors that show popular sections of your website. The cooler colors indicate the less popular areas, which you can work on improving. Here are the following heatmaps offered by Microsoft Clarity:

  • Click heatmaps
  • Scroll heatmaps
  • Tap heatmaps

Helpful tips to use Microsoft Clarity’s

Here are some tips to help you use Microsoft Clarity better.

  • Setting up Microsoft Clarity

Sign in to Microsoft Clarity and visit the “Projects” page. You can add a new project by entering the details of your existing website. Microsoft Clarity supports all websites irrespective of their traffic volume.

When you add a new project, you will receive a tracking code by getting redirected to the Setup page. You need to copy and paste the code into the head section of your website. You can also use the Google Tag Manager template or Clarity’s WordPress plugin. If you have multiple third-party platforms, you will get related assistance from Clarity.

  • Fine-tuning Microsoft Clarity

Microsoft Clarity is simple to use and you can get started with it in no time. It also offers several other beneficial features that help protect your website and its data. Let’s look at them.

  • Protecting website data

Microsoft Clarity offers three masking modes to ensure the tool does not capture the sensitive text of your website. Strict masking offers complete protection. The next option is balanced that masks only sensitive text. It includes email addresses, numbers, and other input fields.

The relaxed option does not mask any text on your website. Besides these masking modes, you also get the choice to mask images. However, it is essential to know that Clarity is not suitable for websites with sensitive data that includes financial and medical information.

  • Preventing tracking certain users

You can use the IP blocking feature to prevent tracking a specific set of users. For example, you may not want to track users that are a part of your team. The dashboard will not display the traffic generated by your team.

  • Using clarity with Google Analytics

You may think that Microsoft Clarity and Google Analytics have several similarities and are competitors. However, both serve different purposes to complement each other. Google Analytics allows you to measure the performance of your website’s traffic and e-commerce.

Clarity also helps you track related metrics and understand user behavior. It is best to use both platforms in unison. For example, you can use Google Analytics to identify the pages that are not performing as expected.

You can then use Clarity to look at user sessions and understand the related flaws. Clarity allows you to get a seamless view of session playbacks that help you improve your website’s performance.

Using Microsoft Clarity to improve website SEO

If you want to improve your website’s SEO and performance, Microsoft Clarity is the tool for you. You can identify the most and least popular pages on your website. This information will help you develop more effective SEO strategies and make changes to your website that will improve user engagement.

You can also use Microsoft Clarity to identify which pages are attracting too much traffic, or not enough traffic. That way, you can optimize your content and design so that people are finding what they need more quickly.

Bottom line

Microsoft Clarity has several features that you would want in an analytics tool, and it’s easy to set up as well. It also gives insights into what’s working and what isn’t on your website. If you are looking to improve traffic and generate sales, Clarity is a tool that you should use. Once you start using Clarity, you’ll wonder how you could ever do without it.

If you are looking for assistance to set up and use Clarity for your business, we can help. Contact us today to know more details on how we can help you make the most of Microsoft Clarity.

Categories
Forms Wordpress Plugins

How to Create Hassle Free Contact Forms for WordPress with WPForms Plugin  

A contact form is one of the vital aspects of a website as your visitors can easily enquire about your products and services. If you are looking to add a contact form to your WordPress website, it should not be that difficult. In this article, we show you how you can use the WPForms plugin to create a contact form.

Let’s see how to create a free contact form for your WordPress site using the WP Forms plugin.

This plugin allows you to create multiple forms like survey forms, signup forms, email subscription forms, and more for your website. Some of the features of this plugin are:


  • Available both as free and paid versions.
  • With simple drag and drop options, it makes the page user-friendly to create the forms according to the user’s requirements.
  • The builder is highly responsive with a variety of templates that help in creating complex forms easily.
  • Can get integrated with multiple payment gateways like Stripe, Paypal, etc.
  • Offers conditional logic that helps in the creation of complex forms.
  • It is spam-protected that protects your website.


Step 1- To use the WP Form plugin, visit wordpress.org and find the plugin you need in the search box. And search for WP form. Alternatively, if you are on the WordPress dashboard, you can go to the Plugins > Add New page and search for WP Forms Lite.


Step 2– Install and activate the selected WP Form plugin. A lot of people know that this plugin is used to create contact forms, but you can also use this plugin to create more content. There are multiple options available like complaints forms, bug tracking forms, support card forms, IT service request forms, and more.

WP Form plugin

WP Form plugin


Step 3- Go to Dashboard and then to All Forms. Here, you will see all the templates that are created, and when you click on the Add New Contact form, you will see a list of blank templates where you can select one to create the form from the scratch. Select “Simple Contact Form.”

WP Form plugin

.


Step 4– Upon selection, it imports an already-created blank contact. Now, rearrange the fields according to your requirements using simple drag and drop options. You can also add new fields by choosing from the options present on the left-hand side of the page (for example, checkboxes, drop-down lists, etc.). You can also add in advanced options like CSS class, choosing font size, etc. After designing the form, you can choose the email ID to send the notification from the notification area present under the options. The Confirm tab saves a message and the same message will be sent later as part of the confirmation to the email id mentioned.

WP Form plugin


Step 5- After creating the contact form, go to the WordPress site, select the options page  and from the dashboard, create a new one. Publish the page after creating it. Once the page is published, add the block by entering the shortcode as shown below.

WP Form plugin


WP Form plugin


Step 6- After entering the shortcode, you can go to the display page to see the created contact form. The sample has been shown below

WP Form plugin


If you have the pro version of the plugin, you get extra features such as multiple sites, client management features, word press multisite support, geolocation, etc.


I hope this helps in the creation of the contact form using the WP forms. For any doubts and clarifications, you can post your queries in the comment section below.


Get WPFroms Pro

Let us help you get
your project started.

+91-9967253697
info@spanrig.com

LET’S WORK TOGETHER?

Provide your project requirements